

There's something almost magical about watching a tiny tomato seed transform into a sprawling vine loaded with sun-ripened fruit. We've been doing this for decades here at Baker Creek, and every spring still feels like the first time.
Starting tomatoes from seed isn't complicated, but it does reward patience and attention to the basics. Skip the fancy gadgets and miracle products. What tomatoes really want is warmth, light, good air, and a gardener who checks on them without fussing too much. Let's walk through it together.
Timing: The Rule That Actually Works
Most folks mess up timing in one of two ways: they start too early because they're excited (we understand!), or they wait too long and end up with puny transplants that can't catch up. Here's the trick we've learned over the years:
Don't start by the calendar—start by your transplant reality.
Figure out when you can actually put plants outside without heroic measures. That means nights aren't dipping into cold-stress territory, your soil isn't refrigerator-cold, and your garden isn't a mud pit. Now count backward 6–8 weeks from that date. That's when you plant your seeds.
| Your Spring Type | When to Start Seeds |
|---|---|
| Cold spring, short season, windy site | 8 weeks before transplant |
| Average spring | 6–7 weeks before transplant |
| Warm spring, strong indoor lights | 5–6 weeks before transplant |
"The goal isn't giant seedlings. The goal is balanced seedlings: thick stem, tight leaf spacing, healthy green color. If your plants are 14 inches tall, pale, and floppy before they ever touch the garden, they're not 'ahead'—they're stressed."
Choose Varieties for Your Climate
What you grow depends on where you're located. Here's a quick guide based on decades of experience:
Up North (Short Summers)
Stick with small cherries and salad tomatoes—they ripen quicker in short summers. Black Cherry is probably our favorite of the cherry tomatoes. It's like a Cherokee Purple in a bite-size package. Another favorite is the Sweetheart Cherry—a little heart-shaped red one, packed full of flavor, and it produces tomatoes till who flung the chunk.
Down South (Hot and Humid)
You've got the heat and the time, so you can go big with slices and beefsteaks. In the deep south, smaller varieties like salad and plum sizes work well. Anywhere north of Florida, try Cherokee Purple—it's good in the heat and humidity. Ozark Pink is another excellent choice for southern gardens.
In the Middle
Well, you can dabble in both! Try a mix of quick-ripening cherries and larger slicers.
Germination: Tomatoes Are Heat Lovers
If tomato seeds could talk, they'd say: "Wake me when it's warm." These are tropical plants at heart, pretending to be garden vegetables. They germinate best when the soil is cozy—somewhere between 70–80 degrees Fahrenheit.
Here's the honest truth: if your seeds are slow to sprout and come up unevenly, that's almost always a temperature problem, not "bad seed." A cheap soil thermometer turns guesswork into certainty.
Heat Mats: Amazing Tool, Real Tradeoff
Heat mats are wonderful for tomatoes, especially if your house runs cool. But here's what folks forget: heat mats dry out your trays faster. So if you use one, check moisture daily. Think of it as germination help—not a slow cooker you set and forget.
The Reliable Germination Rules
- Sow shallow—about a quarter inch deep. Tomato seeds don't want to climb out of a cave.
- Keep the seed zone warm—70–80 degrees is the sweet spot.
- Expect sprouting in 7–14 days, often faster when conditions are just right.
- Pre-moisten your mix before sowing. Don't plant into dry mix and water it in—that can bury seeds too deep or create dry pockets.
- Put two seeds per cell to make sure you get that plant.
The Best Seed Starting Mix
Tomato seedlings don't need "rich" soil right away. What they need is a mix that holds moisture evenly, drains freely, and stays fluffy. Compaction is the silent killer of young roots.
We use Royal Gold Potting Mix. It's light, fluffy, and great for planting seeds. The texture is sifted fine and consistent, which matters more than most people realize when you're filling tiny cells. It holds moisture without getting soggy.
What Your Mix Must Do
- Hold moisture evenly (no dry pockets)
- Drain freely (roots need oxygen, not swamps)
- Stay fluffy (compacted soil equals stunted roots)
- Be consistent across all your trays
Whatever you use, never start seeds in garden soil. And don't scoop dirt out of your yard—your seeds deserve better. Garden soil compacts, it's inconsistent, and it often brings weeds, microbes, and bugs that could inhibit germination or the quality of your seedlings.
Moisture: The Goldilocks Zone
Keep the soil moist like a damp sponge. Not a swamp. Too wet, and they'll drown. Too dry, and they'll croak. Happy in the middle is just right.
The Damping-Off Warning Signs
If seedlings suddenly collapse at the soil line, looking pinched or water-soaked, that's damping-off. There's no saving infected plants—remove them immediately. But you can often save the rest by improving airflow, watering less, and getting more light on them.
Light: The Difference Between Stout Seedlings and Spaghetti
If there's one place folks under-shoot, it's light. A sunny windowsill sounds lovely—and it can work in a pinch—but it rarely produces the compact, sturdy transplants you're after. Seedlings reach and stretch toward inadequate light, getting leggy and weak. By the time you plant them out, they're all stem and no substance.
The fix is simple: get lights close and keep them on long enough.
What Enough Light Looks Like
- Deep green color (not pale or yellowish)
- Short spacing between leaves
- Thick, sturdy stems
- Plants that look ready to face the world, not desperate for it
LED shop lights on a simple shelf work wonderfully. Keep lights 2–4 inches above your seedlings and raise them as plants grow. Aim for about 16 hours of light per day. A timer is worth its weight in gold here.
"Put your lights on a timer and stop thinking about it. Consistency is everything with seedlings."
In the Garden: Mulch, Support, and Feed
Mulch Early and Often
Once the plants hit the garden, mulch early. Best mulch in the world? Your own homemade compost. If you don't have that, straw, leaves, or clippings will do. If there's anything you can do in your garden space: mulch, mulch, mulch. Keeping that soil surface covered fixes so many problems with plant stress, bugs, and pH issues.
Support Your Plants
Like a good friend, tomatoes need support. Indeterminate tomatoes need to get staked up. Stakes, cages, or trellises—whatever you've got. Just keep the fruit off the ground. It'll help your plants and make for easier picking.
Feed When They're Hungry
Once your plants get big and strong, that's when they're hungry. Feed them with liquid seaweed fertilizer or make a batch of compost tea from comfrey leaves. Think of it like a tomato energy drink—just don't overdo it. Steady snacks, not buffets.
Dealing with Enemies
Tomatoes do have enemies. Here's how to handle them:
Hornworms
Those giant green caterpillars can eat a plant overnight. Hand-pick them when you see them.
Aphids
They're tiny but mighty—they'll suck the life out of a tender shoot. But you can wash them off with water or let ladybugs handle it.
Blight
The tomato grower's heartbreak. The trick is prevention: pick blight-resistant varieties, keep air flowing through your plants by gently removing lower leaves, and never water the leaves—always water at the base.
Companion Planting Helps
Marigolds nearby look great and help keep pests away. Plant beneficial plants that attract helpful insects—sweet alyssum and even letting your cilantro turn into coriander will attract parasitic wasps that help fight aphid pressure.
Don't forget the old saying: one for the mouse, one for the crow, one to rot, one to grow. Plant more than you think you need, because you never know what's going to happen.
Harvest and Storage
Pick tomatoes when they're fully colored, just a little soft to the touch. You can let them ripen fully on the vine for that sun-warm flavor, or harvest them once they start to blush and let them finish indoors. That way you beat the bugs and the birds.
Once ripe, keep them on the counter, never in the fridge. Cold kills the flavor.
Got Too Many?
That's when you start canning, making sauce or salsa for the winter. If you want to do all your tomato paste canning in one weekend, plant a whole pack of Martino's Roma—they're determinate and they all come ripe at once. If you want to spread it out, plant Amish Paste. That way you can can every other week all summer long.
Heirloom Varieties We Can't Stop Growing
Pick an heirloom seed that you love, because if you don't love the tomato, you won't love to grow it. Here are some favorites that have earned permanent spots in our trials—and in our home gardens.

Cherokee Purple
Rich, smoky, wine-like flavor

Black Cherry
Cherokee Purple in bite-size

Kellogg's Breakfast
Sweet orange beefsteak

Pineapple
Stunning bi-color, fruity flavor

Great White
Mild, sweet, low acid
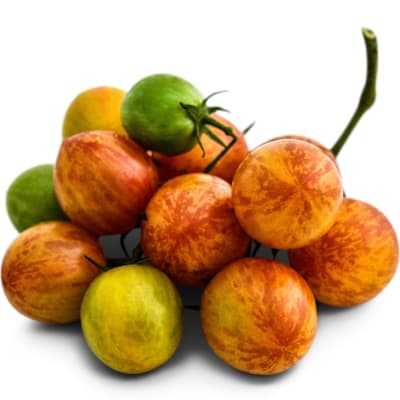
Sunrise Bumble Bee
Gorgeous striped cherry

Green Giant
Tangy, sweet when ripe

Mortgage Lifter
Huge, sweet, meaty fruits
Browse our complete collection of over 120 heirloom tomato varieties
Seed Storage
Fun fact: heirloom tomato seeds can be stored for up to four to six years if kept cool and dry.
Ready to Start Your Tomato Journey?
Whether you're north, south, or in between, there's a tomato just right for you. Browse over 120 heirloom varieties—all open-pollinated seeds you can save and share.
Shop All Tomato Seeds


